Managing your Grownify website
This guide walks through every part of your WordPress admin you'll use day to day — publishing pages, running your LearnPress courses, managing Amelia bookings, and keeping your SEO and support content current. No developer needed.
Getting Started & Logging In
Everything in this manual happens behind a login. Here's where to sign in and what a first-time login looks like.
Your login details
For security, we don't print live credentials inside this manual. Keep your own copy of these somewhere private (a password manager, not a shared doc):
Logging in
- Go to the login pageVisit grownify.in/wp-admin in your browser.
- Enter your detailsType your username (or email) and password into the two fields.
- Click Log InYou'll land on the Dashboard — the home base covered in the next section.
Dashboard
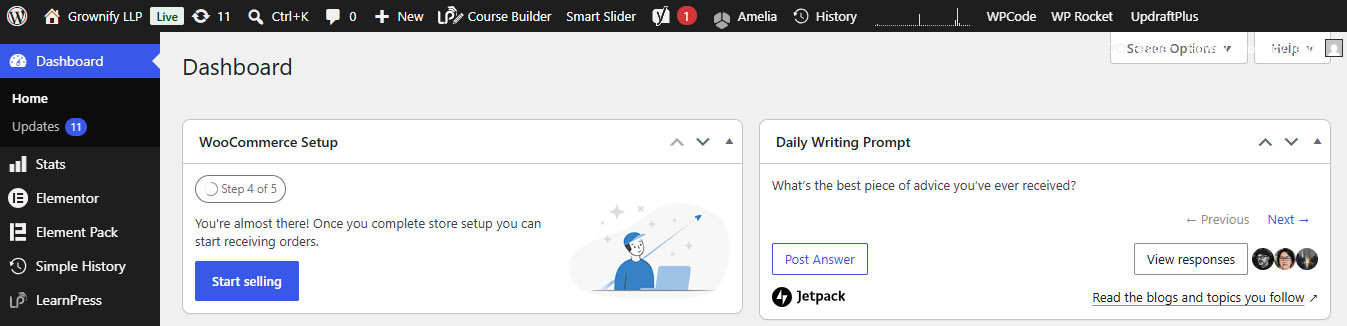
Your home base after logging in — a snapshot of site activity, recent orders, and quick shortcuts to the areas you use most.
What you'll see here
- Activity summary — new enrollments, recent bookings, and pending orders at a glance.
- Quick links — one-click shortcuts to Add Course, Add Page, and Media Library.
- Site health — a status indicator showing whether updates or attention are needed. Green means all clear.
Pages
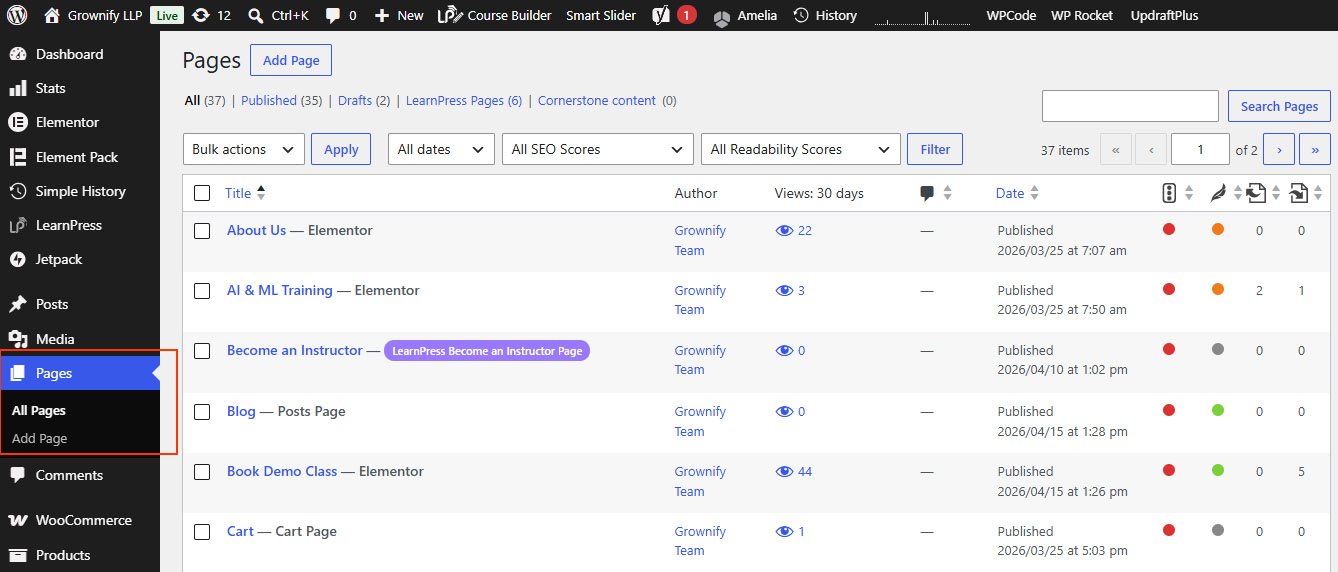
Every static page on your site — Home, About, Contact, and any landing pages — lives here. This is where you'll make most day-to-day text and image edits.
Editing an existing page
Pages on this site are built with Elementor, a drag-and-drop page builder — not the default WordPress editor.
- Find the pageOpen Pages → All Pages and locate it in the list, or use the search box at the top.
- Open with ElementorHover over the page title and click Edit with Elementor (not the plain "Edit" link).
- Make your changesClick directly on any text, image, or button on the canvas to edit it in the panel that opens on the left.
- Preview before publishingUse the eye icon at the bottom of the left panel to preview the page before it goes live.
- UpdateClick the Update button at the bottom of the left panel to save your changes to the live site.
Media Library
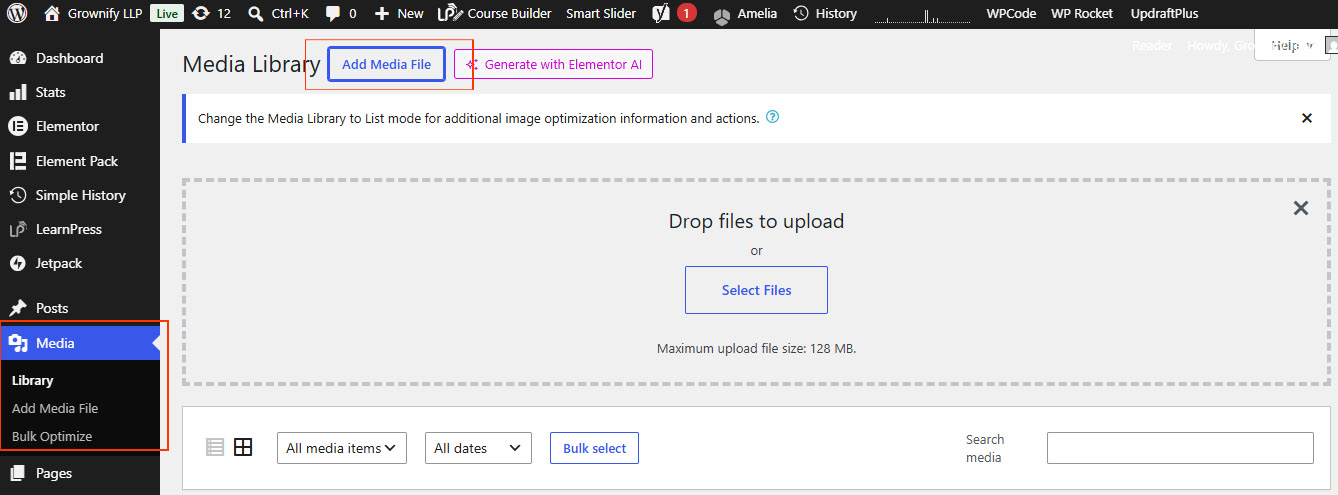
Every image, PDF, and file uploaded to your site is stored and reused from here — course thumbnails, page images, downloadable resources.
Uploading new files
- Go to MediaClick Media → Add New in the left menu.
- Drag and dropDrop your file into the upload area, or click Select Files to browse.
- Add alt textClick the uploaded file and add a short description in the Alt Text field — this helps SEO and accessibility.
| File type | Recommended size |
|---|---|
| Page & blog images | Under 500KB, 1600px wide max |
| Course thumbnails | 800×450px, under 300KB |
| Downloadable PDFs | Under 10MB |
Form Submissions
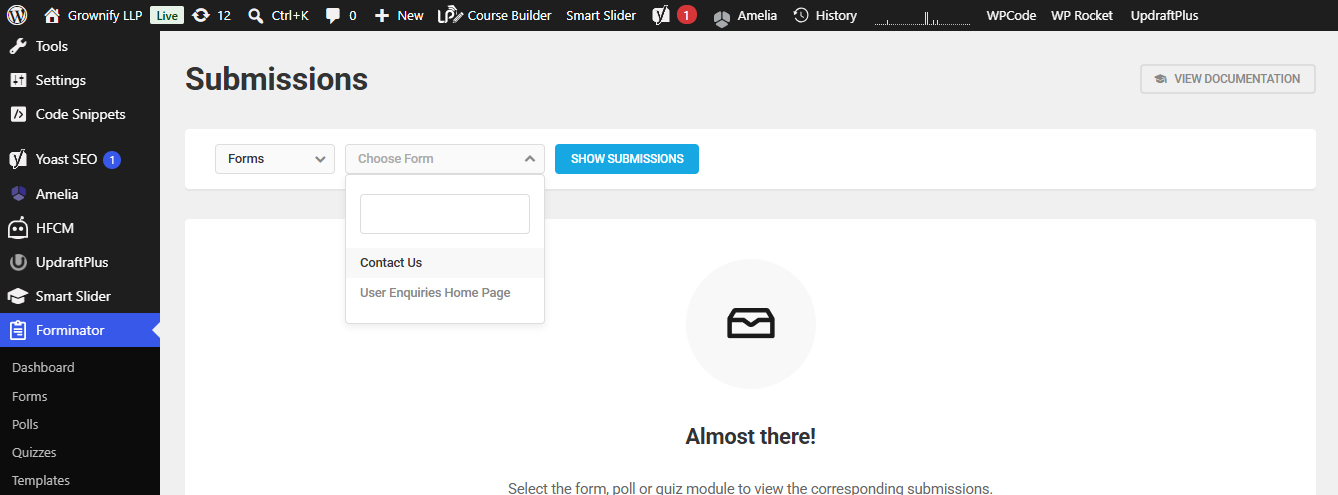
Every message sent through a contact or inquiry form on your site — where to find it, and how to make sure you never miss one.
Checking a form submission
- Open SubmissionsIn the left admin menu, click Forminator → Submissions.
- Choose the formUse the dropdown at the top to select which form you want to review (e.g. "Contact Us").
- Open an entryClick any row to see the full submission — every field the visitor filled in, plus the date and time.
- Export if neededUse the Export button to download all submissions for a form as a CSV file.
Checking email notifications
Forminator can also send you an email every time a form is submitted. Go to Forminator → Forms, open the form, and check the Behaviour → Notifications tab to see or update which email address gets notified.
All Courses
The master list of every course on your site, published or in draft, with enrollment counts and quick-edit access.
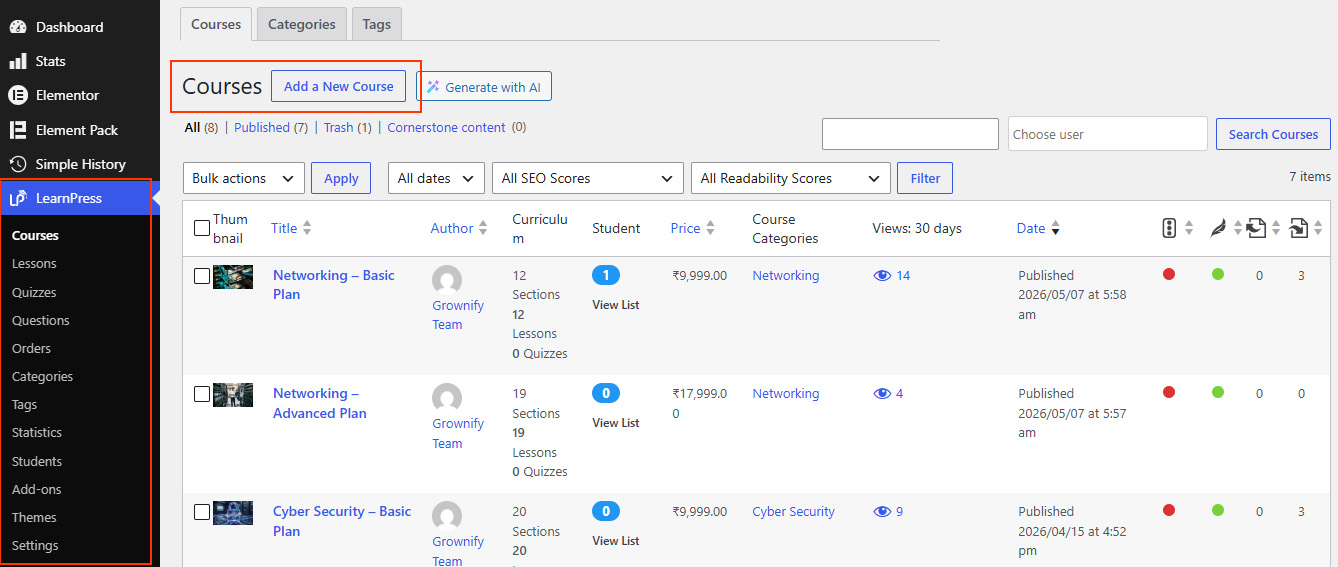
- Filter by status (Published, Draft, Pending) using the tabs above the list.
- Sort by enrollment count or date to see your most popular courses.
- Use Quick Edit to change a title or price without opening the full editor.
Add Course
Create a brand-new course. This sets the foundation — you'll add lessons and quizzes afterward in Curriculum.
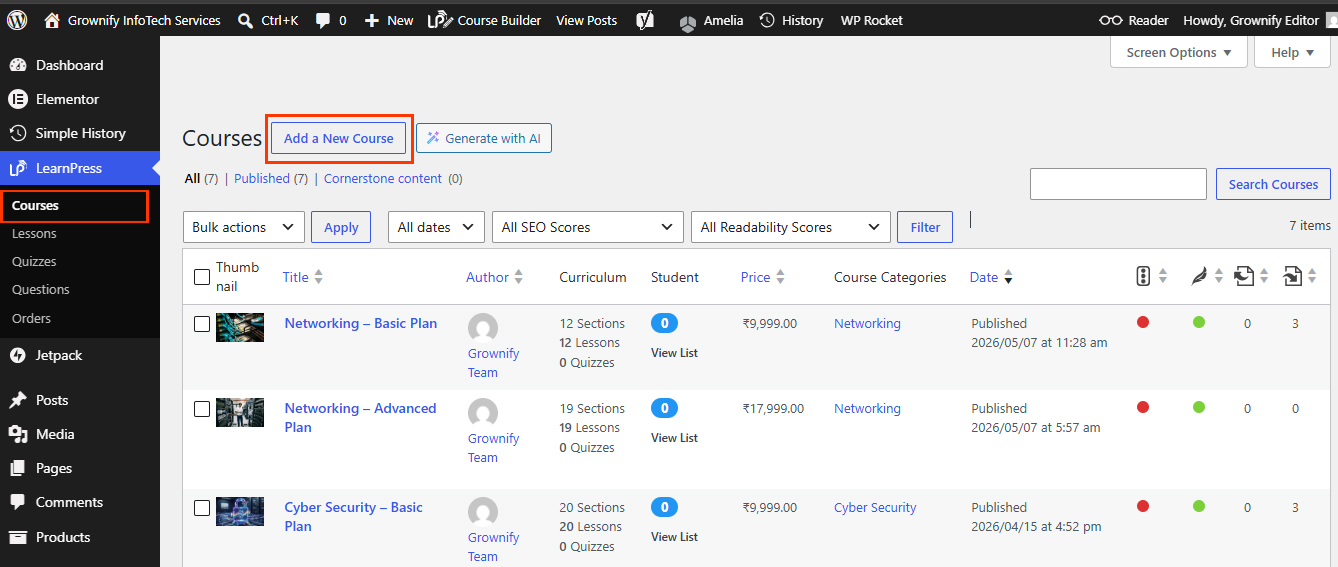
- Title and descriptionGive the course a clear name and write the overview students see before enrolling.
- Set a featured imageThis is the thumbnail shown on your course catalog — pull it from Media Library or upload a new one.
- Choose a categoryAssign it to an existing category so it appears in the right filter on your site.
- Save as draftClick Save Draft first — you'll set pricing and build curriculum before publishing.
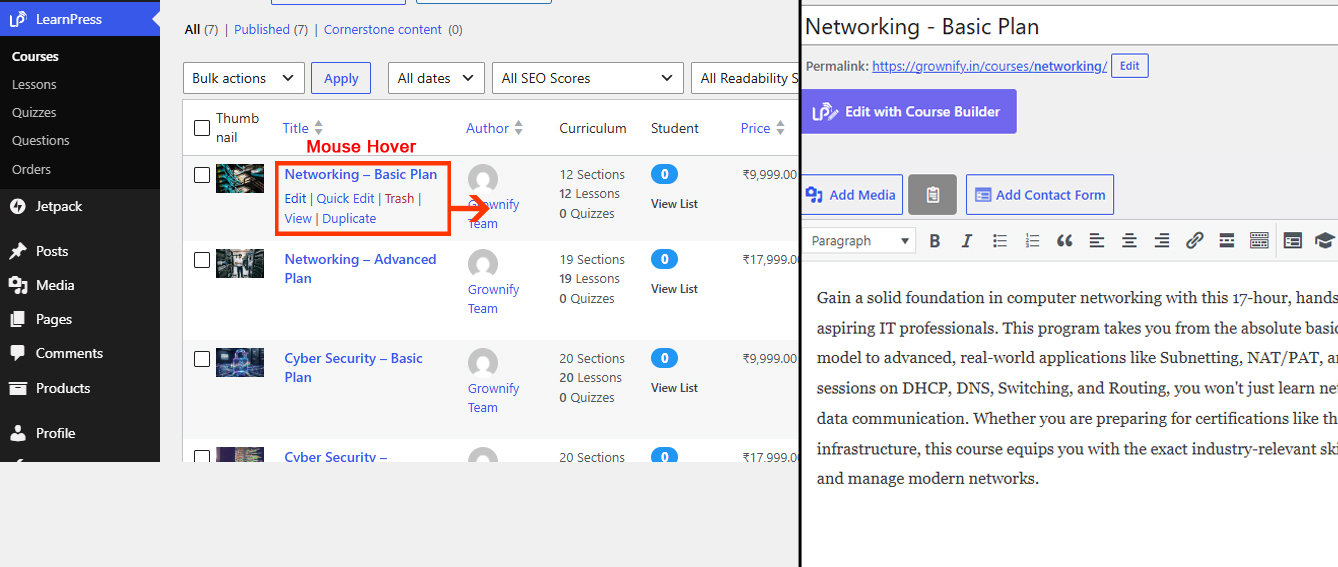
Edit Course
Update details on any existing course — title, description, image, category, or status.
Curriculum
The structure of a course — the ordered sections, lessons, and quizzes a student moves through from start to finish.
- Add a sectionClick + Add Section to create a new module (e.g. "Week 1: Getting Started").
- Add itemsInside a section, click + Curriculum Item to insert a lesson or quiz.
- ReorderDrag sections or items by the handle icon to change the order students see.
Lessons
The actual content students consume — video, text, or downloadable material, one per lesson.
- Each lesson has its own editor, similar to editing a Page.
- Embed video by pasting a YouTube or Vimeo link directly into a video block.
- Attach downloadable files (worksheets, slides) using the file block.
Quizzes
Knowledge checks placed inside a course's curriculum — multiple choice, true/false, or short answer.
- Name the quizGive it a clear title matching the lesson it follows.
- Add questionsClick + Add Question, choose a type, and enter the answer choices.
- Set a passing gradeUnder Settings, choose the percentage a student needs to pass.
Pricing
Set whether a course is free or paid, and configure the price shown at checkout.
Orders
Every course purchase, with payment status and student details — your record for reconciling revenue. This lives in wp-admin, separate from Course Builder.
- Filter orders by status: Completed, Pending, Cancelled, or Refunded.
- Click an order to see the student's contact info and purchased course.
Enrollments
Who's enrolled in what — and how far along they are. Use this to manually enroll someone or check on a student's progress. This also lives in wp-admin.
- Manually enroll a studentClick + Add Student, choose the course, and enter their email.
- Check progressClick on a student's name to see which lessons and quizzes they've completed.
Appointments
Every booking made through your site's scheduling tool — 1:1 sessions, consultations, or discovery calls.
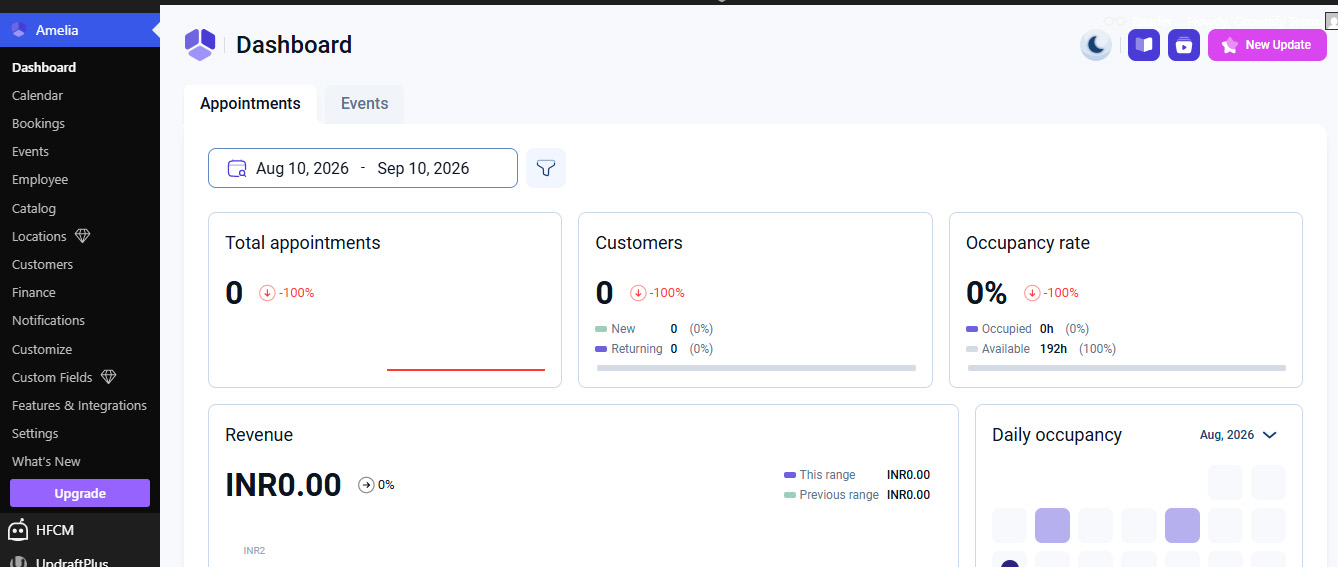
- Click any appointment to see client details, time, and service booked.
- Change status to Approved, Pending, or Canceled from the dropdown on each row.
- Manually add a booking with + Add Appointment for phone or walk-in requests.
Checking upcoming appointments
When someone books through your "Book an Appointment" page on the site, it shows up under the Upcoming Appointments section of the Amelia dashboard — this is the fastest way to see what's coming up without digging through the full list.
- Shows bookings in date order, soonest first, so you always know what's next.
- Click a listing to see the client's name, service, and time without leaving the dashboard.
Calendar
A visual day/week/month view of all appointments — the fastest way to see your schedule at a glance and block off unavailable time.
Customers
A directory of everyone who's booked through Amelia, with their contact info and booking history.
- Search by name or email to find a specific customer's history.
- Export the full list to CSV using the button at the top-right for use in email tools.
Site Maintenance
Two plugins keep the site running fast and safe behind the scenes — a caching tool and a backup tool. You won't need to touch either often, but it helps to know where they are.
Clearing the cache (WP Rocket)
The site uses WP Rocket to load pages faster by saving a cached version of each page. If you make a change and it doesn't seem to show up on the live site, clearing the cache almost always fixes it.
- Open WP RocketIn the left admin menu, go to Settings → WP Rocket (or look for the WP Rocket rocket icon in the top admin bar).
- Clear cacheClick Clear Cache (or Remove All Cached Files) — either from the settings page or the shortcut in the top admin bar on any page.
- Re-check the pageReload the page you edited — your change should now appear.
Backups (UpdraftPlus)
UpdraftPlus automatically backs up the site's files and database on a schedule, so there's always a recent copy to restore from if something goes wrong.
- The Existing Backups tab shows every backup taken, with the date and what's included (files, database, or both).
- Click Backup Now to trigger a manual backup before making a big change to the site.
- Restoring from a backup is best done with developer support — it will roll the site back to that point in time.
Frequently Asked Questions
Quick answers to the questions clients ask most often.
I published a change and don't see it on the live site.
Clear your browser cache with a hard refresh (Ctrl/Cmd + Shift + R). If it still doesn't appear, check that the page status is set to Published, not Draft.
Can I undo a change I just made to a page?
Yes — open the page editor and check the Revisions panel in the right sidebar to restore an earlier version.
A student says they can't access a course they paid for.
Check LearnPress → Orders to confirm payment status is Completed, then check Enrollments to confirm they're listed against the correct course.
How do I add a new team member with admin access?
Go to Users → Add New, enter their email, and assign the appropriate role. Use Editor for content-only access, or Administrator for full access.
Support
If something in this manual doesn't cover your situation, here's how to reach us.
Email support
For non-urgent questions or change requests. We typically respond within one business day.
Email: contact@webcubator.co.in
Priority issues
For anything affecting live payments or site availability, flag it as urgent in your request so it's triaged first.